GEGL Plug-Ins for GIMP. Part Three: Writing C Plug-Ins
This is the third in a series of articles about GEGL plug-ins for the GIMP image editor. See also part one and part two for more about GEGL plug-ins and using them from inside GIMP.
You don’t need to know C to use this article, or be a programmer.
Note: you can also use GEGL plug-ins outside of GIMP, e.g. in the gegl command-line program and maybe even in GNOME-Photos, unless you use GIMP-specific features such as calling other GEGL operations that GIMP provides.
Why do it?
GEGL Plug-ins are super easy to use in GIMP with on-canvas preview, and you can even save and load settings. They are in the C programming language and are nice and fast, sometimes taking advantage of your graphics card or multi-threading.
Although you can write scripts for GIMP in Python, Schema, JavaScript, Lua, and maybe more languages, those scripts don’t get a preview at all, or just get a tiny one in a pop-up window.
GEGL plug-ins can also be used as part of more complex GEGL graphs, like building blocks.
How hard is it?
Someone who hasn’t written any C before and isn’t a programmer can translate the GEGL Chain syntax shown in part two into C, with a little practice. You may need help from a C programmer if you get errors or get stuck. This article mentions some of the common errors, though.
Allow about an
hour to turn a GEGL chain into a C plug-in the first time, and about another hour to get it to compile if you haven't done that before.
An Example

You can write a plug-in like this ii a very short time. We’ll make a much simpler one to start with in this tutorial. Notice the on-screen preview.
GEGL plug-ins in C are much more likely to get integrated into GIMP, if they are useful, than GIMP plug-ins or even scripts, now that GIMP uses GEGL internally.
Getting Started
You can download gegl-plug-in-tutorial.zipor you can go to https://gitlab.com/barefootliam/gegl-plug-in-tutorial and clone the repository to get the sample files for this tutorial.
Start with a copy of the blank-gegl-plug-in folder, which contains the following files:
README.md to describe your plug-in so people can use it;
shadowtext.c (change shadowtext to the name of your new operation, but use underscore _ instead of a space if you need to, and no other punctuation; it must end in .c)
config.h (if you built your own opy of GEGL you might be able to use the config.h from that build instead, which would be better, but try this one first)
meson.build to tell the meson program how to build your plug-in;
build_linux.sh which is a simple shell script to run meson;
LICENSE; these plug-ins are distributed inder the GNU Public Licence version 3 or later.
To make your plug-in, you’ll need to edit shadowtext.c (or whatever you called it), and also update README.md, meson.build, and build_linux.sh
Plug-in C file structure
A GEGL plug-in has a structure like this:

In an editor that does syntax highlighting for C programs it might look like this:

You will almost certainly find working with C files easiest if you use an editor that shows colours, whether it’s vim or gedit or gnome-text-editor or notepad++; you might have to configure or enable syntax highlighting/colouring in some editors. It’s worth doing, because the slightest mistake, such as a missing quote or semicolon, will make your program not work, and mistakes like that are very obvious if half your program is suddenly coloured bright blue (or whatever).
So, there are three sections in the file. First, there’s the comment at the top, with the licence. Change the licence to include your name on a line after Pippin’s name, complete with the * at the start so it lines up nicely. Lining things up is another way to spot errors, so although it doesn’t matter inside a comment that isn’t executed, it’s a good habit to develop.
The second section, after the #ifdef GEGL_PROPERTIES line, is where
you define the properties your plug-in will take. We’ll start
without any properties and then come back and add some later, so for
now you can leave this section empty. In the template it just has a comment to say there are no properties yet.
The third and final section is between the #else line and the #endif line at the end of the file. Your plug-in will always have the starting comment, the ifdef, the else and then endif lines. This third section is where the code goes!
Yipes! What do we put there? Well, there’s actually already a lot of code in there, that I didn’t include in the screen-shots yet. All we have to do is to tweak it a little.
Connecting graph nodes in your attach function
Your plug-in will define a new GEGL operation. When this operation is connected to a GEGL graph, the GEGL library can call a function in your C code. This function is normally called attach, and although you could call it purchase_more_socks if you wanted, using conventional names helps people to understand your code and to help you if you get stuck, and it helps you to read other people’s plug-ins and copy stuff!
We’ll start by writing a GEGL plug-in for this GEGL Chain pipeline:
gaussian-blur
sepia
Take a photograph and duplicate the base layer in GIMP, then paste those two lines of text into GEGL Graph with the upper layer active. We’re blurring the image and then making every pixel be a shade of a base colour (cyan by default).
This isn’t a very useful effect as it stands, but we can see if it worked easily, and then we can improve it.
So, let’s look at the plug-in template. You’ll find there’s a function in it called attach that looks like this, just like any other function in the C programming language:
static void
attach (GeglOperation *operation)
{
GeglNode *gegl = operation→node;
GeglProperties *o = GEGL_PROPERTIES (operation);
GeglNode *input, *output;
input = gegl_node_get_input_proxy (gegl, "input");
output = gegl_node_get_output_proxy (gegl, "output");
/* construct your GEGL graph here */
}
All we need to look at is that comment, construct your GEGL graph here. We’re going to build a graph and connect some nodes together. Each node in the graph is a GEGL operation, a graphics filter like Gaussian Blur.
Our sample GEGL graph is very simple:

It’s an example we saw in part two of this article. It blurs the active layer and then colours the blurred result a sort of brownish-yellow. We could draw this in a diagram, like this:

There are four nodes in our graph, two of which are invisible. They are:
- input, provided automatically;
- gaussian-blur, which we have to create and connect to the input;
- sepia, which we have to create and connect to the output of gaussian-blur;
- output, provided automatically.
To make this graph, we’ll call the GEGL function gegl_connect-many(), like this:
gegl_connect_many(input, gaussian_blur, sepia, output, NULL);
The NULL at the end is required to tell the C compiler where the list ends.
Now, replace the entire line with the /* construct your GEGL graph here */
comment on it with that
gegl_connect_many() call.
If you try to compile your plug-in (I’ll show you how to do that later, but you could skip ahead if you’re impatient), you will get an error about gaussian_blur and sepia being undefined. That’s because we haven’t created them yet.
So change the line that says,
GeglNode *input, *output;
to
GeglNode *input, *output, *guassian_blur, *sepia;
Now we’ve declared the variables that refer to those new nodes, but we still haven’t told our program to create the nodes. To do that, make a new line before the gegl_connect_many() line, and add,
gaussian_blur = gegl_node_new_child (gegl, "operation", "gegl:gaussian-blur", NULL);
sepia = gegl_node_new_child (gegl, "operation", "gegl:sepia", NULL);
Don’t forget the NULL at the end of each line, or your plug-in will crash! The commas and semicolons and double quotes are all important, too, of course.
We need to do some housekeeping before we try and compile: near the end of the C file there’s a function called gegl_op_class_init which is how our C plug-in tells GEGL and GIMP what it’s called and when to run out attach function we just modified.
Change the strings carefully (don’t change anything outside the double quotes) to have the following values (you don’t need to change reference-hash):
"name", "barefootliam:blur-sepia-simple",
"title", _("Blur and Sepia Simple Example"),
"categories", "Artistic",
"reference-hash", "45ed565h8500fca01b2ac",
"description", _("Sample GEGL operation for tutorial"),
You should use an identifier of your own instead of barefootliam, of course. This way you’re less likely to conflict with other gegl operations.
Finally, near the start of the file (line 31 in my copy) there are three lines that should read like this:
#define GEGL_OP_META
#define GEGL_OP_NAME blur_sepia_simple
#define GEGL_OP_C_SOURCE blur-sepia-simple.c
Notice the underscores on the second line and the hyphens on the third (which must match the actual filename you chose).
Save your C file, blur-sepia-simple.c, and next we’ll try compiling it!
Compiling your plug-in
This is often a pain to get set up and working, but after that you’ll be able to compile plug-ins easily. If you’re lucky enough to be running a GNU/Linux™ system, install meson, ninja, and gegl-dev (or gegl-devel on some systems) with your package manager, and then see the Compiling section below.
First, make sure meson is installed (Windows users, see the special section just for you).
Then edit the file meson.build and make two changes:
right at the start, the first few non-blank lines should be:
project('blur-sepia-simple', 'c',
version : '0.1',
license : 'GPL-3.0-or-later')
On about line 30, we need to see,
shlib = shared_library('blur-sepia-simple', 'blur-sepia-simple.c', 'config.h',
c_args : lib_args,
dependencies : [gegl],
name_prefix : '',
)
You’ll just need to change the first line of that, to mention
blur-sepia-simple twice. Save the file with those changes.
Building Your Plug-in (Linux and most Unix systems)
(Windows and Mac users, see the following sections.)
You’ll need to open a terminal window and use the cd command to go to the directory containing your filers (tab completion works on directory names, to make it easier).
Next, type,
./build_linux.sh
or you can run,
meson setup --buildtype=release build
ninja -C build
This should create a file called blur-sepia-simple.so – possibly after printing lots of messages. Use
ls
to see if it’s there. If so, copy that file,
cp -a blursepia.so ~/.local/share/gegl-0.4/plug-ins/
Be careful to include the trailing / in the command. If you get an error no such file or directory, do this:
mkdir ~/.local/share/gegl-0.4/plug-ins
If you have a different version of GEGL installed, the 0.4 will be different;
ls -l ~/.local/share | grep gegl
will show them all. If you have more than one version of GEGL or GIMP installed, there might be more than one place to copy the new plug-in.
Macintosh Users
Compile as for Linux, but see part one of this series, https://barefootliam.blogspot.com/2022/10/gegl-plug-ins-for-gimp-part-one-using.html for installing a plug-in under Macos. Note, GIMP does not support iOS (iPad or iPhone).
Compiling Your Plug-in (Microsoft Windows)
Download msys2 from https://www.msys2.org/
Open an msys2 terminal: C:\msys64\mingw64.exe
Install necessary packages:
pacman --noconfirm -S base-devel mingw-w64-x86_64-toolchain mingw-w64-x86_64-meson mingw-w64-x86_64-gegl
meson setup --buildtype=release build
ninja -C build
Then copy the resulting DLL or EXE file to your GEGL plug-ins folder (you may need to create the plug-ins folder inside the GEGL folder). That folder is likely to be something like:
C:\Users\Volodymyr\AppData\Local\gegl-0.4\plug-ins
(where Volodymyr is your Windows user name)
If it doesn’t work
If you get a message about meson not found, or no such command, you need to install it.
The next most likely error will be a whole stream of output from meson calling gcc, with stuff undefined, and maybe gegl.h not found.
This means you need to install the GEGL development package, likely called gegl-dev or gegl-devel, in the same way as for meson.
If you get syntax errors, make sure you remembered the semi-colon ; at the end of each statement you added, and that you have all the commas.
If you get a message that something is undefined, make sure you remembered to declare the variables gaussian_blur and sepia. Make sure also to use the underscore in gaussian_blur and not a hyphen or space, as C names can’t include hyphens or spaces.
You can also try compiling the sample plug-in (see the end of this article) or maybe one of someone else’s GEGL plug-ins, and see if it works. If not, get that working before trying your own, to make sure your system is set up.
Once you can compile a sample plug-in, or one you downloaded, go back to trying the one you made in this tutorial. If it still doesn’t work, find me (or anyone else with some experience in programming in C) and ask for help. Be prepared to supply your C file and the full log of all your errors, not just the last few lines.
It compiled and installed! What next?
Next is to run GIMP, then open an image (a colour photo or drawing
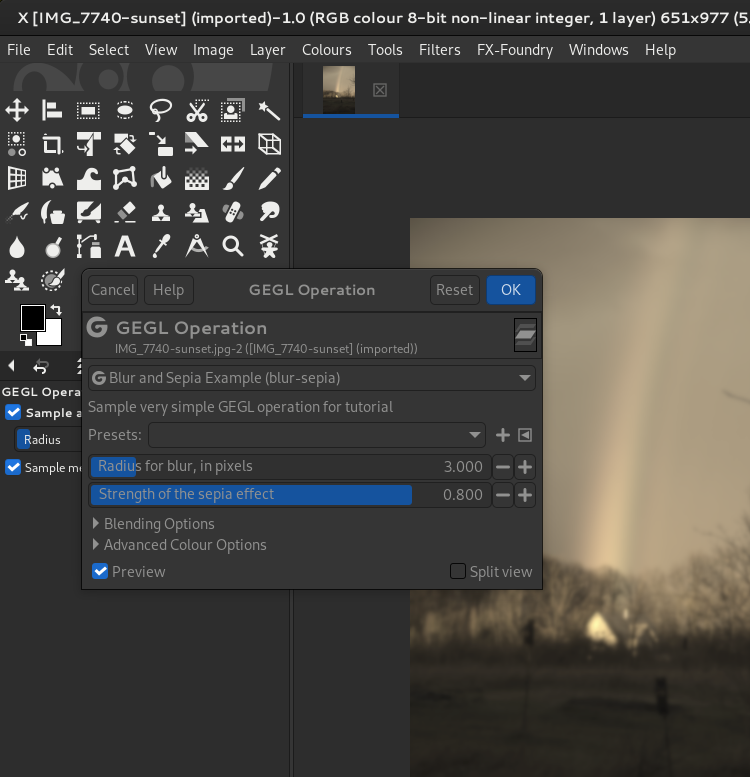
would be best). Choose the menu Filters→Generic→GEGL Operation
(Or, Tools→GEGL Operation) and in the GEGL Operation dialogue box choose “Blur Sepia Simple”
as the filter.
You can also use it in the GEGL Graph plug-in, invoking it as my:blur-sepia-simple or, for short, just blur-sepia-simple. Here’s what it might look like in GEGL Operation:

If your new GEGL plug-in doesn’t appear anywhere in the list in GEGL Operation (it might appear sorted alphabetically or at the end, depending maybe on your system language), make sure you copied it to the right place after compiling it, and quit and restart GIMP. Make sure also that you changed the plug-in’s name near the end of the file.
If it still doesn’t appear, run GIMP from a terminal, and look for messages that might give a clue as to why it didn’t work, or try the finished example from the tutorial files.
Here’s a quick checklist:
You renamed the plug-in file to blur-sepia-simple.c
You edited the op name and file name in the #define lines near the start
You added the gegl_node_link_many() lines
You edited the strings in gegl_op_class-init near the end of the file
You edited the file meson.build on two separate lines to mention your plug-in, so it gets built.
You are putting the .so file (if Linux) into the right directory. Gegl-0.x/plug-ins with x being 3, 4, 5 or whatever, and plug-ins having a hyphen. If you’re not sure, download one of LinuxBeaver’s GEGL plug-ins with a precompiled binary and see if it shows up when you recompile GIMP.
If you are on a Mac, you need to see Part One of this article for instructions on allowing the operating system to run programs you built yourself.
OK, that was likely more painful to describe than to do! As long as you go carefully a step at a time, everything should work fine. It’s a lot of fun to see your plug-in work for the first time!
Next Step: Properties
This plug-in we wrote is all very well, but it’s not configurable at all! The blur radius is whatever gegl:gaussian-blur has as a default, and the sepia effect is always at full strength. Let’s add a couple of properties to control it.
GEGL node properties are things like the radius for blur, or the name of a font to use. In the GEGL Operation user interface they translate to sliders, text fields, text boxes and other user interface controls that let people change values and see the results right away.
Here's another example from LinuxBeaver, Glossy Balloon:

There’s a huge number of controls there, including sliders like “Balloonification” (is that even a word? fabulous!) and there’s a file chooser button for an overlay texture. Here’s another example, this time LinuxBeaver’s Rock plug-in:

Rock is in split-screen preview mode in the screenshot, so the black part of the K sticking out is from the original text layer before the effect was applied. There are even more user interface components in this plug-in, including a knob to set the lighting angle and an eye dropper for colour, and chain-links to tie some sliders together.
Our example is much, much simpler, since we’re just adding two sliders, but the Coliseum was built from simple bricks, right? Let’s get started!
Make a new copy of the plug-in you wrote, e.g. like this:
cd .. # go out of the gegl-blur-simple directory
cp -a gegl-blur-sepia-simple gegl-blur-sepia
cd gegl-blur-sepia # go into the new folder
rm -rf obj* # be careful not to put a space in front of the star!
Now you should be in gegl-blur. So let’s start by editing meson.build to change gegl-blur-sepia-simple to gegl-blur-sepia in all three places (on two different lines).
Excellent!
Now let’s rename the file:
mv -i blur-sepia-simple.c blur-sepia.c
Now edit blur-sepia.c and first, get rid of -simple everywhere.
Great!
Now, in the section at the start of the file that looks like this:
#ifdef GEGL_PROPERTIES
/* none */
#else
we are going to delete the /* none */ and instead define two properties:
#ifdef GEGL_PROPERTIES
property_double (blur_radius, _("Radius for blur, in pixels"), 3.0)
description (_("Strength of the blur effect: higher values give a more blurred result."))
value_range (0.0, 65535) /* arbitrarily large number */
ui_range(0.0, 35.0) /* for the slider in the user interface */
property_double (sepia_strength, _("Strength of the sepia effect"), 0.8)
description (_("Strength of the sepia effect: higher values give a more blurred result."))
value_range (0.0, 1.0)
#else
(if you copy and paste from this tutorial, check the double quotes didn’t get turned into “curly ones” by the publishing software)
What does all this mean? Let’s look in detail at the first one.
property_double (blur_radius, _("Radius for blur, in pixels"), 3.0)
The start of the line, property_double, means we are defining a property called blur_radius and the property value is a double-precision floating-point number. A double, in the C programming language, is a number with a fractional part, like 0.5, and thats what we want for radius because that’s what the GEGL gaussian blue operation takes. How do we know? We’ll see in a moment.
The explanation follows, and after that the initial value that’ll be used if blur_radius is not given will be 3.0. The _( . . .) syntax means the string inside can be translated into other languages, if someone takes the time to do it. We won’t cover that in this tutorial, though.
After that first line we have a description:
description (_("Strength of the blur effect: higher values give a more blurred result."))
Then we declare what values are allowed for our new property; I chose 65535 as a maximum blur radius. This pair of values is used if the operation is called from C, or from the GEGL Graph plug-in, and should be the largest range that makes sense:
value_range (0.0, 65535) /* arbitrarily large number */
In the GEGL Graph plug-in, or in the GEGL Workshop program, or other GUI-based tools that use GEGL, there’ll probably be a slider or a knob for people to turn to set the value of the blur radius. A slider that goes from zero to 65535 would be almost impossible to use, so we allow a much smaller range for the user interface:
ui_range(0.0, 35.0) /* for the slider in the user interface */
It’s very important that users can’t use the slider or knob to set values that will make the plug-in go wrong, so GEGL checks that the user interface ui_range() values are both inside the range of the value_range values (or equal to them). If you get this wrong, your plug-in might not compile, or will compile but it won’t run. There will be an error message, most likely on the console, about the UI value being out of range.
For our second property, the value_range and the ui_range are the same, so we only need to specify the value_range.
Now, we have given our plug-in two properties. But it doesn’t use them. Let’s check the GEGL documentation for the operations we use. First, Gaussian Blur.
https://www.gegl.org/operations/gegl-gaussian-blur.html
This page says, Performs an averaging of neighboring pixels with the normal distribution as weighting, which for most people means pretty much nothing. Luckily we can ignore it. We are looking at this Web page for the description of which properties we can give to gaussian blur.
A little further down the page we find
Size X
Standard deviation for the horizontal axis
name: std-dev-x type: double default: 1.50 minimum: 0.00 maximum: 1500.00 ui-minimum: 0.24 ui-maximum: 100.00 ui-gamma: 3.00 ui-step-small: 1.00 ui-step-big: 10.00 ui-digits: 2 unit:pixel-distance axis:x
OK, let’s reformat that a little.
Size X; Standard deviation for the horizontal axis
name |
std-dev-x |
type |
double |
default |
1.50 |
minimum |
0.00 |
maximum |
1500.00 |
ui-minimum |
0.24 |
ui-maximum |
100.00 |
ui-gamma |
3.00 |
ui-step-small |
1.00 |
ui-step-big |
10.00 |
ui-digits |
2 |
unit |
pixel-distance |
axis |
x |
Well, OK, so the property name is std-dev-x. Unsurprisingly, there’s another property for the vertical blur radius, std-dev-y. We’ve only added one property, blur_radius, so we’ll use the one value of that property to set both std-dev-x and std-dev-y.
If you read further down the Gaussian blur Web page, we’ll see other properties with even more cryptic names, but we’ll ignore them. In the Going Further On Your Own section I’ll explain how to find out more about them.
Let’s check the Web page for gegl:sepia while we’re about it:
https://www.gegl.org/operations/gegl-sepia.html
Sepia has an Effect Strength property, which is a double and goes from zero to one, which is why I used that for the range when I declared our sepia_strength property.
So OK, let’s wire our two properties to the GEGL operations our little graph uses. That way, when the user sets blur-radius in the dialogue box for our plug-in, the “standard deviation” of the Gaussian blur operation will get changed automatically.
After the line we already have,
gegl_node_link_many (input, blur, sepia, output, NULL);
we’ll add four new lines (the first is just a comment to explain what’s happening, so you don’t need to type it if you don’t want to)
/* arrange to pass on our two properties to their respective nodes */
gegl_operation_meta_redirect (operation, "blur-radius", blur, "std-dev-x");
gegl_operation_meta_redirect (operation, "blur-radius", blur, "std-dev-y");
gegl_operation_meta_redirect (operation, "sepia-strength", sepia, "scale");
Here, operation is our own operation. We are telling GEGL to redirect changes to our blur-radius property to the std-dev-x and stdf-dev-y properties of the node in the graph pointed to by our blur variable, and the same for sepia.
Notice the hyphens: GEGL automatically changes the underscores we used when declaring the properties into hyphens. That’s because the C programming language we’re using doesn’t allow hyphens in variable names.
Believe it or not, that’s all we have to change! Save your file, run ./build-linux.sh and copy the plug-in into place, then restart GIMP.
Wow. That was a lot of description, but it was also pretty easy as these things go. We have a plug-in that people can actually use! If you want to redistribute it, remember also to edit README.md to make a description of what it does, and put it up on gitlab or github, and then link to it in a comment to this article.
The equivalent of id and ref: reusing streams
In part two of this article you saw how we can make more complex graphs that aren’t just a straight pipeline, using id=1 to label a stream and ref=1 to connect to it elsewhere.
https://barefootliam.blogspot.com/2022/12/gegl-plug-ins-for-gimp-part-two-gegl.html
We used this graph:
id=text
gaussian-blur
std-dev-x=5 std-dev-y=56
svg:darken
aux=[ ref=text ]
To make this, our attach function might look a little like this:
gegl_node_link_many (input, blur, darken, output, NULL);
gegl_node_connect_from(darken, "aux", input, "output");
The gegl_node_connect_from function always takes exactly four values. These are the destination node and pad, and the source (input) node and pad. The above C statement takes the output pad of the input node (this is supplied implicitly by GEGL along with the output node) and connects it to the aux pad (or secondary input) of the node pointed to by darken.
This is an example of the C programming language doing things backwards; the string copy functions work the same way in C. So this is actually what a C programmer would expect.
If you compile this, you’ll get a blur-darken operation that makes a sort of simple drop shadow.
Another Example
Here’s one more example from LinuxBeaver, to reward you for reading this far! If you only download one plug-in for GEGL, get this one, Layer Effects.

Going Further
The best way to start finding out more about GEGL is to explore the GEGL Web site:
You can also download some more GEGL plug-ins that other people have written, and look at their source code. Some places to look:
https://github.com/LinuxBeaver?tab=repositories
https://gitlab.com/barefootliam
GEGL plug-ins are sometimes discussed on one or more GEGL forums and on Discord.
You can also check out the GEGL source code at:
https://gitlab.gnome.org/GNOME/gegl
See https://www.gimp.org/discuss.html for links to the chat where the developers hang out, and there are also forums such as http://gimpchat.com and https://www.gimp-forum.net where GEGL plug-ins are discussed.
Macintosh users will find this link useful:
https://developer.gimp.org/resource/macos-plugin-publishing/
Another GEGL plug-in:
https://github.com/4Evergreen4/pixelsort
Have fun!
Appendix: Reference
The following notes introduce some more things you can do, not covered in the tutorial.
We have only covered one function, attach(). There are others, defined in the GEGL source code in gegl/operation/gegl-operation.h — here are the more common ones:
attach |
Called when your operation is connected to a graph; should construct any subgraph it needs; |
prepare |
Called when all property values are known but before processing. Can be invoked by GEGL more than once if properties change. |
get_bounding_box |
returns the size and offset of the output; GIMP uses this to make a new layer, or to resize the layer being filtered |
process |
Called when the graph is actually used; it does the work |
finalize |
Called when the graph is dismantled; should free any memory that was explicitly allocated, to avoid memoy-leaks |
update_graph |
Called whenever properties change values. You can use this to hide or show properties based on a checkbox, for example, or to “rewire” the graph based on property values |
The operations that come with the GEGL source code use all of the call-back function listed above (attach, update_graph and so on).
It’s possible to make plug-ins that have properties divided into categories, with a drop-down menu in the user interface (GEGL Operation) to choose which category is defined. This involved defining an enumerated type in C (an enum) and associating it with each property you want to be listed in a category with a ui_role declaration. See e.g. LinuxBeaver’s Aura plug-in for an example.
The supported property types are defined in gegl/gegl-op.h (beware, there’s some deep magic in this file, so don’t try to understand it all if you aren’t familiar with C, but it has lists of things like the property types, which are:
property_double(name, label, def_val)
property_int(name, label, def_val)
property_string(name, label, def_val)
property_file_path(name, label, def_val)
property_uri(name, label, def_val)
property_boolean(name, label, def_val)
property_pointer(name, label, def_val)
property_object(name, label, def_val)
property_enum(name, label, enm, enum_name, def_val)
property_seed(name, label, rand_name)
property_format(name, label, def_val)
property_curve(name, label, def_val)
property_path(name, label, def_val) (a vector path, not a file path!)
property_color(name, label, def_val)
property_audio_fragment(name, label, def_val)
The property statements that can go after a property declaration are also in gegl/gegl-op.h and are:
description(blurb)
value_range(min,max)
ui_range(min,max)
ui_gamma(gamma)
ui_steps(small_increment, big_increment)
ui_meta(key,val)
ui_digits(digits)
You can define an enumerated type using
enum_start(enum_name)
enum_value(value, nick, name)
enum_value_skip(value) for example if a value is no longer used
enum_end(enum)
(again, see examples), and you can tie a property’s visibility to an enum using
ui_meta("visible", "prop_name {some_value}")
and the corresponding control in the GEGL Operation dialogue box will only be visible when the property called prop_name (which must be an enum) has the value some_value.
See LinuxBeaver’s GEGL-Effects---Layer-Effects-in-Gimp-using-GEGL/GEGL_EFFECTS/gegleffects.c for an example.
Sometimes you want to reconfigure a graph, for example adding some operations or removing them on the fly. It can be easier to do this if you have a gegl:nop operation at the start and end of the section you want to change. This is a no-operation operation: it just copies its input to its output. Actually, GEGL might even remove these nodes for processing purposes, so they don’t necessarily slow things down.
I hope this has been helpful. More GEGL articles may be in the works!


1 comment:
Do you know if it is possible to write GEGL plugins in python?
Post a Comment