In Part One of this article we looked at running GEGL plug-ins as live filters, using the GEGL Operation dialogue. GEGL plug-ins are super cool and have live on-canvas preview. Now in Part Two we’ll take it to the next level and look at the more powerful GEGL Graph GIMP plug-in.
GEGL Graph is a plug-in that comes with GIMP; you don’t need to install it specially. It’s for running and exploring GEGL filters; this is powerful but relatively advanced image processing. You can also use GEGL Graph for a lot of fun text effects that go beyond most scripts.

For photographers, you can experiment with combining new features; for graphic designers (including Web designers), you can save and re-run whole groups of filters without having to learn Python or script-fu or C. Even better, unlike with a Python GIMP plug-in, GEGL Graph gives on-canvas previews. For artists, you can save GEGL Graph files and apply them to different images, or even generate them by program.
For programmers, you can also use GEGL Graph as a tool to help you create and test new filters in C, and we'll look at that in Part Three.
GEGL Graph uses a really easy text-based language, and shows the results as you type. For example, to blur the active layer or selection, and then to colour the image yellowish-brown like an old faded photograph, you might type
gaussian-blur
sepia
This means, first run a blur filter, then take the output of that filter and run sepia on it. The output of sepia replaces the pixels in the active selection, on the active layer. You can run GEGL Graph on layer masks, channels, or any "drawable", of course.
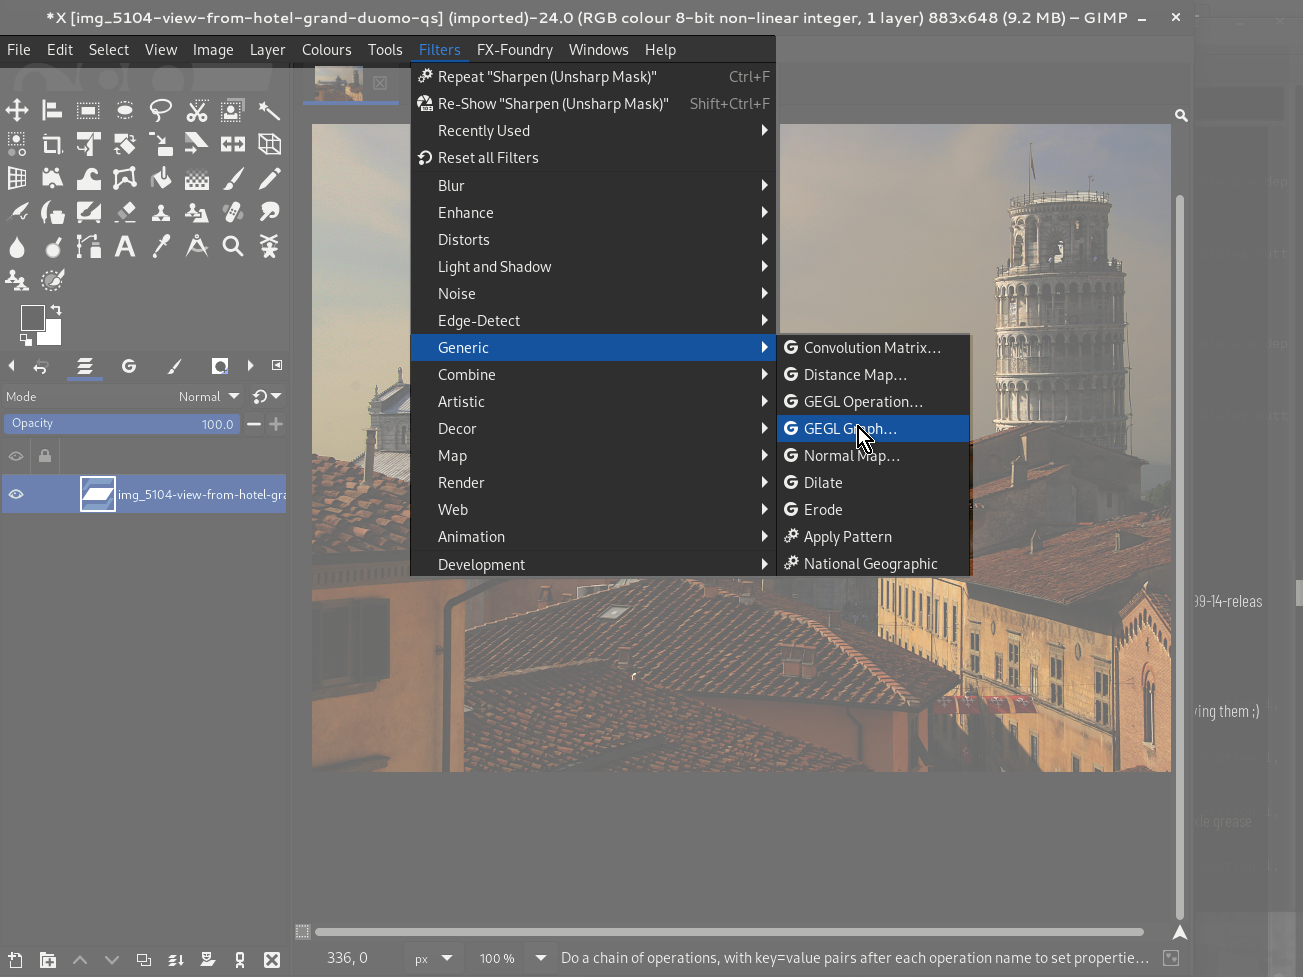
Try it now: you’ll find GEGL Graph in the Filters menu under "Generic".
When you first use it, or if you press Reset, the GEGL Graph dialogue has a long explanation in it; don’t worry about it for now. Instead, clear the text box by selecting all that wall of text and pressing Delete, and then type:
gaussian-blur
sepia
Make sure “Preview” is checked (enabled) at lower left. You can also enable “split view” so you can see both the original and the filtered layer. Here's what mine looks like, with the preview on the left and the original on the right:

Of course, you could do the same thing in this case by running the Gaussian Blur filter and then the Sepia filter. GEGL Graph starts to get more interesting if we give values. Try this:
whirl-pinch pinch=0.1 whirl=-180

The picture shows the result if you have preview set to “split screen” (at the bottom right of the GEGL Graph window).
You can put a # in front of a line to “comment it out” so that the plug-in ignores it. If you try,

What’s really going on?

Well, this is a pretty simple graph. The diagram doesn't show the full picture, either: it doesn't show the amount of "pinch" being done, nor the blue radius. Those are each a GEGL property and they each have a value, which of course has to be valid. You can't use a negative radius for blur, for example.
For now, let’s draw the graph in a little more detail and then look at some more interesting examples.

In this diagram, the properties of each filter, or gegl operation, are listed. The first, gaussian blur, has five properties: std-dev-x, std-dev-y, filter, abyss-policy, clip-extent. Of these, we only gave the first two values in our input to the GEGL Graph plugin, so the others are given in square brackets to show they have default values.
The second GEGL operation in our graph, whirl-pinch, has three properties: whirl, pinch, radius, of which we set only the first two.
The diagram also shows a yellowish diamond-shaped blob for the input pad of each operation, and a pink diamond-shaped blob for the output pad. Soon we‘ll meet GEGL operations that have a second input pad, for example to combine two images.
Here are a few of the GEGL operations you could try. Clear out the text box in GEGL Plug-in and try some of these, either one at a time or in combinations; you can change the property values and see the effect.
oilify exponent=3 mask-radius=6
emboss depth=5
engrave row-height=12
hue-chroma hue=3 lightness=5
Now let’s look at a more complex example, and you’ll begin to see why GEGL Graph is so powerful, and why it can be worth learning even if at the moment it looks complicated. This next example adds text to an image, and updates as you edit the text. Later, you can come back and run GEGL Graph again to change the text, or to change some of the filter steps. This particular graph is based on one by LinuxBeaver.

In the picture there's a photograph of the author's back yard with the word Winter in the sky; the letters are frosted with a heavy texture. The GEGL Graph plug-in box shows the following crazy-looking text; don't worry for now about how complicated it is!
text string=" Winter\n" size=420 font="Windsor Com Heavy"
color-overlay value=#ffffff
cubism tile-size=13.2 seed=320
gaussian-blur std-dev-x=1 std-dev-y=1
emboss elevation=94 depth=29 azimuth=1
oilify exponent=16
invert
emboss depth=5
hue-chroma lightness=-19
id=1
multiply aux=[ ref=1 ]
hue-chroma lightness=-04
id=2
gimp:layer-mode layer-mode=linear-light
blend-space=rgb-perceptual aux=[ ref=1 ]
Wow. Rather than explain exactly how this works and what it does, we'll see how to explore the filters, and how to combine them. We’ll come back to this example later.
For now, note that you can edit the text (Winter) and see the changes right away, and that you can re-run this crazy beast at any time, even on another image altogether. So people can share GEGL Graph filters, too, and save them in text files for later use. Note that you could paste that text into GEGL Graph right now to try it. You might need to change the font name, of course.
GEGL Chain Syntax
Here’s what you can put into the GEGL Graph text box. You can also use most of it in the stand-alone gegl program. If you don't like details you can skip this section and come back to it if you need to later. There's also an informal grammar at the end of ths post.
A GEGL Chain is a syntax, a way of writing GEGL image processing graphs. It’s powerful and pretty simple.
It’s a mixture of operations, their properties, and links.
A GEGL operation is just a name, like gaussian-blur. If the filter comes from GIMP, it’ll have gimp: right in front of its name, like gimp:layer-mode. The filters that come with GEGL all have gegl: at the start, but you can leave it out. This means you can write gegl:gaussian-blur or you can write just gaussian-blur and it’s the same. But you can’t leave the gimp: out where it’s needed. the gimp: prefix is sometimes called a namespace, perhaps by analogy with XML namespaces.
After a name you can have any number of property=value pairs. Be careful: you can’t have spaces around the = sign.
A value can be a number (0.6, 38), a CSS colour like #FFcc33, a name, or a string in double quotes; if there's no spaces or punctuation you can leave off the quotes.
You’ll see in a moment how to find out what properties a given operation takes.
You connect GEGL operations just by putting one after the other, as we saw with gaussian-blur and pinch-whirl earlier. It's easiest to edit if you put them on separate lines, but you don't have to.
Blank lines are ignored. Lines starting with a # are comments and are also ignored.
Next, links. You can write, id=name, to save a reference to a connection. Then you can refer to it with ref=name. The name can be a number; just don't include punctuation or spaces. So, id=david and ref=david would be fine, but you can't do, id=sally's machine gun, because it has punctuation (the apostrophe) and spaces.
Finally, some GEGL operations have more than one input. They can take an entire chain! The extra inputs are called either aux or, if there's lots, aux1, aux2, and so on. You supply a whole new chain to the aux pad of an operation like this:
multiply aux=[ text string="hello" invert ]
This example will multiply each pixel in its input with the coresponding pixel on a new layer (or GEGL buffer) made by writing "hello" and then inverting the colours of the layer. Notice the spaces after the [ and before the ] — if you leave these out, it won’t work.
Re-using part of the graph
You can use ref=name to supply input you saved earlier:
id=1
. . .
multiply aux=[ ref=1 invert ]
would take the result where you put id=1 and feed a copy of it to multiply after inverting it.
Let’s try an example. One way to do a drop shadow for text in GIMP is to duplicate the text layer, then blur the lower copy, maybe moving it a little. In GEGL Graph we can do this without having to duplicate the layer.
Start by adding some text in black on a white background:

Now, with the text layer saying CAMELS FOR SALE (or whatever), bring up the GEGL Graph plugin. We can start with
gaussian-blur std-dev-x=5 std-dev-y=5
Adjust the numbers if you need to, to get blurry text.
Now we want to put the original input layer on top, so we can read it. To do that, before blurring the text we’ll save a copy of it. Then, we’ll add it back in, with “darken only” which is available to us as svg:darken (the resource guide near the end of this article shows you how to find that out, dont worry!). We could also use gimp:normal in this case, or any of a number of other blend modes to put the original text on top of the blur, but we’ll just pick one.
id=text
gaussian-blur std-dev-x=5 std-dev-y=56
svg:darken aux=[ ref=text ]
So this is a bit more complicated. We save the input state as “text” and then, later, we re-use it as an auxilliary (second) input to the svg:darken GEGL operation. You can save what goes through the pipe between any two nodes and reuse the saved connection as often as you like. You should see something like this:

The CAMELS FOR SALE text now has a blurry grey outline. It would look better if the light appeared to come from the upper left, the normal for most Western readers. So we can move the blur down a few pixels and right a few pixels:

Well that certainly pops. I used this:
id=text
translate x=x y=9
gaussian-blur std-dev-x=5 std-dev-y=56
svg:darken aux=[ ref=text ]
If we move the id=text so it’s after the translate, what will happen? Well, we’d be saving the state after the move, so both the blurred text and the darken-only text would be moved down. But we only want to move the blur. Try it and see.
We can make it a little more readable with comments:
id=text # remember the original input
translate x=x y=9 # move down and right
gaussian-blur std-dev-x=5 std-dev-y=56 # blur the input
# Now put a copy of the original input over the
# blurred and moved version, using the Darken
# compositing mode (layer mode)
svg:darken aux=[ ref=text ]
You could save that in a text file, and paste it back when you need it. Or, you could click on the little triangle to the right of Presets in the GEGL Graph dialogue, choose Export Current Settings to File, and later use Import Settings From File to get it back. In Part Three of this article we’ll see how to rewrite this graph as a C-language GEGL plug-in so we can run it directly.
What if you want to change the text? If you use the text tool on the layer, you will see a message from GIMP, The layer you selected is a text layer but it has been modified using other tools. Click Edit to “Confirm text editng”, change the text, then go to the Filters menu and choose Repeat GEGL Graph, and run the graph again. Or if you did other things in the meantime, under Filters find Recently Used and choose GEGL Graph from there. Or, if its a day later, open GEGL Graph and use the Presets to choose the last graph you used.
The graph isn’t stored anywhere, so in case you send someone your xcf file, or come back to it a year later, you might want to save those settings alongside the xcf file.
You can also include text in your graph, instead of starting with a text layer. If you do that, you see the text update as you type it. There’s an example of that in part one of this article.
Either way, used on a text layer or a blank layer making its own text, you can do a whole bunch of operations with one click. It’s like scripting in that regard, except the language is much easier and you get an on-canvas instant preview. Wow!
The picture in the introduction
The “Using GEGL Graph” picture at the start of this article was made by running the following GEGL Graph on each of three text layers, changing the colour and rotation angle between-times:
# optional rotation
rotate degrees=0 sampler=lohalo
# color
color-overlay value=#0effff
# stroke
dropshadow x=0.00 y=0.00 radius=0.00 grow-shape=circle grow-radius=12 opacity=1 color=#ffffff
dropshadow x=0.00 y=0.00 radius=0.00 grow-shape=circle grow-radius=12 opacity=1 color=#000000
# shadow
dropshadow opacity=0.4 radius=0.1 x=-1.8 y=2.8
Next Up
The third part of this article will be about writing GEGL plug-ins in C, so that you can refer to them in other graphs both in GEGL Graph and in other C plug-ins, and can use them, complete with on-canvas preview, in the GEGL Operation menu.
Resources: Finding out what operations you can use
You can find the names of the various operations and their properties on the GEGL Web site: GEGL Operations.
Each operation has its own Web page describing it, and there are also category pages listing a bunch of similar operations, so you can see all the layer modes (like svg:darken) on the compositors page, for example.
The aux input is called a pad in GEGL-speak, and the Web page for each opertaionlists the pads it has. Most have just input and output. Some, called source or render nodes, have just output. For example, you can load a PNG file, and that doesn’t have any input, just a filename property and the output image. Some operations, called sink nodes, don’t have any output! And a few have input, output, and aux pads. Some have more than one aux pad, too.
The GEGL Graph plug-in will also give suggestions: if you add z=x as a property-value pair, it’ll list all legal properties. Or any other unknown property, it doesn’t have to be z.
Of course, you can look at the C source for GEGL operations. The properties are listed near the start of each C file, so you don’t need to understand programming to read them.
There are also some operations with a gimp: prefix, such as gimp:layer-mode which has properties layer-mode, opacity, blend-space, composite-space, and composite-mode, just like regular layers. Currently these aren’t documented anywhere outside the GIMP source, but they will be covered in part three of this article.
Finally, there are a bunch of third-party GEGL plug-ins. See
https://github.com/LinuxBeaver?tab=repositories
and
https://gitlab.com/barefootliam/gegl-pango-markup
for some examples. If you know of others, please add them in comments to this article.
Debugging Your Graph
If you are running a development version of GIMP, such as GIMP 2.99 (or, in the far distant future, GIMP 12.99 perhaps!) you will findin Edit Preferences a Debugging item near the top (in the list of categories on the left of the Preferences window). You can set the Debug policy to Debug crashes only, so that GIMP doesn’t invoke the debugger with every typo you make.
Note: If you set a property to an invalid value, the GEGL Graph plug-in will try to tell you, but depending on how you started GIMP and your operating environment (Windows, Linux/GNOME, etc.) you might not be able to see the messages. In Linux they tend to be visible if you open a terminal window and run
journalctl -fa
or if you start GIMP from a terminal window by running
gimp
the messages will show up there.
This may be improved in the future.
Unofficial Grammar For GEGL Chain


No comments:
Post a Comment