If
you don’t know about GEGL plug-ins for GIMP, you’ve been missing
out. There’s not many of them, but that’s changing with more
people writing them. And they offer flexibility and power you didn’t
know GIMP had.
This three-part article first shows some of the gegl plug-ins that are available, and how to get them going (it’s easy, don’t worry)
Then, in part two, we’ll look at the GEGL Graph plug-in you can use as a way to make your own super-powerful filters.
Finally, we build up to writing a simple GEGL plug-in in C, written for people without a maths or programming background.
Part One: Using GEGL Plug-Ins
In this article you get to see some of the power and flexibility of the Generic Graphics Library (GEGL) that GIMP now uses internally for most of its work.
What’s special about GEGL Plug-Ins?
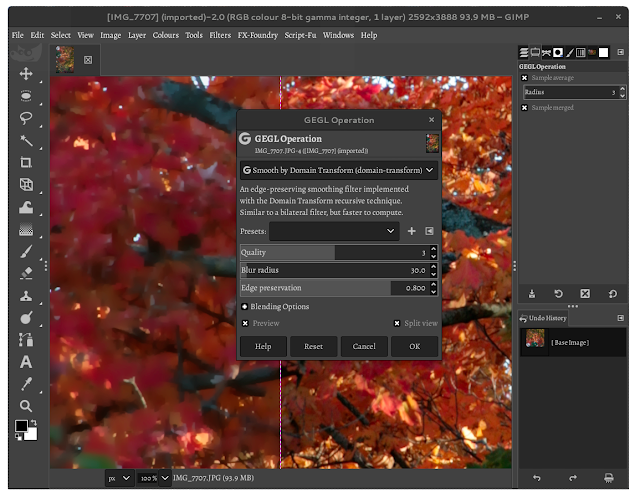
The first thing you notice with GEGL filters and plug-ins is that is you get on-canvas previews. Let’s try one. Open a picture of your grandmother’s pet dog, the one that bit your ankle last Summer. Now go to GIMP’s Tools menu and choose GEGL Operation. If you don’t see it, try Filters⇒Generic⇒GEGL Operation, or press / or use Help⇒Search and Run a Command, and in the window that pops up, type GEGL, and choose GEGL Operation.
Once you have the GEGL Operation dialogue box showing, choose a filter from the drop-down:
 |
| GIMP screenshot showing GEGL Operation in use |
Here I’m showing a preview of “Smooth by Domain Transform” with a split view: the input is on the right and the output on the left. The exact list of GEGL Operations available varies with different GIMP releases. But this GEGL Operation dialog box is where you’ll find the GEGL plug-ins you install as well as the system ones.
Another thing to know about GEGL plug-ins besides the awesome on-screen preview is that they work in both GIMP 2.10 and GIMP 2.99 (soon to be GIMP 3, we hope!). Most other plug-ins and scripts, including python ones, need to be changed, or “ported over”.
Here’s a screencast made by LinuxBeaver of a GEGL plug-in being used:
Before showing you how to install GEGL plug-ins, here’s a couple more screenshots to whet your appetite:
Next, let’s install one!
Installing a GEGL Plug-in
There are four easy steps to follow:
Find a GEGL plug-in you want to install;
Find where to put it;
Put it there;
Restart GIMP.
So let’s take them one at a time.
Find a GEGL plug-in you want to install
GEGL Plug-Ins are discussed on forums and in mailing lists, so a Web search will find some. You can find the ones used in this article here; LinuxBeaver's plug-ins are somewhat easier to use than barefootliam's.
Find where to put it
You need to find your GEGL plug-ins folder, or create it.
On Microsoft Windows this is likely to be
C:\Users\<YOUR NAME>\AppData\Local\gegl-0.4\plug-ins
On Linux and most Unix systems you’re going to want to find (or create) this directory:
$HOME/.local/share/gegl-0.4/plug-ins/
If you have a flatpak install of GIMP, you may want something like this:
$HOME/.var/app/org.gimp.GIMP/data/gegl-0.4/plug-ins/
In each case, look for gegl-0.4 and then the plug-ins folder goes inside it. Depending on when you’re reading this article you might have gegl-0.5 or even gegl-1.0 instead of gegl-0.4. If the number is bigger than four, you may need to recompile the GEGL plug-in before installing it; if it doesn’t have instructions on doing that, see below.
On Macos, look under ~/Library/Application Support/
Put it there
Download the plug-in to your computer and look for a file ending in .dll (Windows) or .so (Linux and Unix, including Macos). You probably need to unzip an archive and find the .so or .dll file inside. Put the file in the plug-ins folder you found in the previous step. On the Mac, you also need to mark it as safe:
sudo xattr ~/Library/Application\ Support/gegl/0.4/plug-ins/my-mac-plugin.so
(you will need to check the exact folder and filename to use)
Restart GIMP
Now you’re ready to run (or restart) GIMP and use the plug-in! It should show up in the list in GEGL Operation.
In
the next part of this article we’ll see another way to run GEGL
plug-ins, or GEGL operations as
GEGL calls them, and we’ll
meet the flexibility of the graphics graph. Things will start to get really interesting because you can combine GEGL operations to make your own professional-quality effects, without doing any complicated programming.


No comments:
Post a Comment